Shopify Integration
Connect a Shopify store to Deskwoot so your agents and your AI bot see customer order history, product details, and inventory directly in the conversation sidebar. Setup takes about 10 minutes.
The Shopify integration in Deskwoot pulls customer order history, product details, and inventory into the conversation sidebar, so agents and the AI bot can answer questions about real orders without leaving the chat. Setup takes about 10 minutes through Shopify's Dev Dashboard. Setup takes about 10 minutes and uses Shopify's Dev Dashboard to issue an access token scoped to your store.
How the connection works
Each merchant creates their own small Shopify app inside Shopify's Dev Dashboard, gives Deskwoot the app's Client ID and Client Secret, and Deskwoot then runs an OAuth handshake on the merchant's store. After approval, Shopify hands Deskwoot the access token it needs to read your store. We don't ship a single shared app because Shopify's distribution rules don't fit Deskwoot's pricing model. Every merchant runs their own app, with their own credentials, scoped to their own store.
Step 1. Open Shopify Dev Dashboard
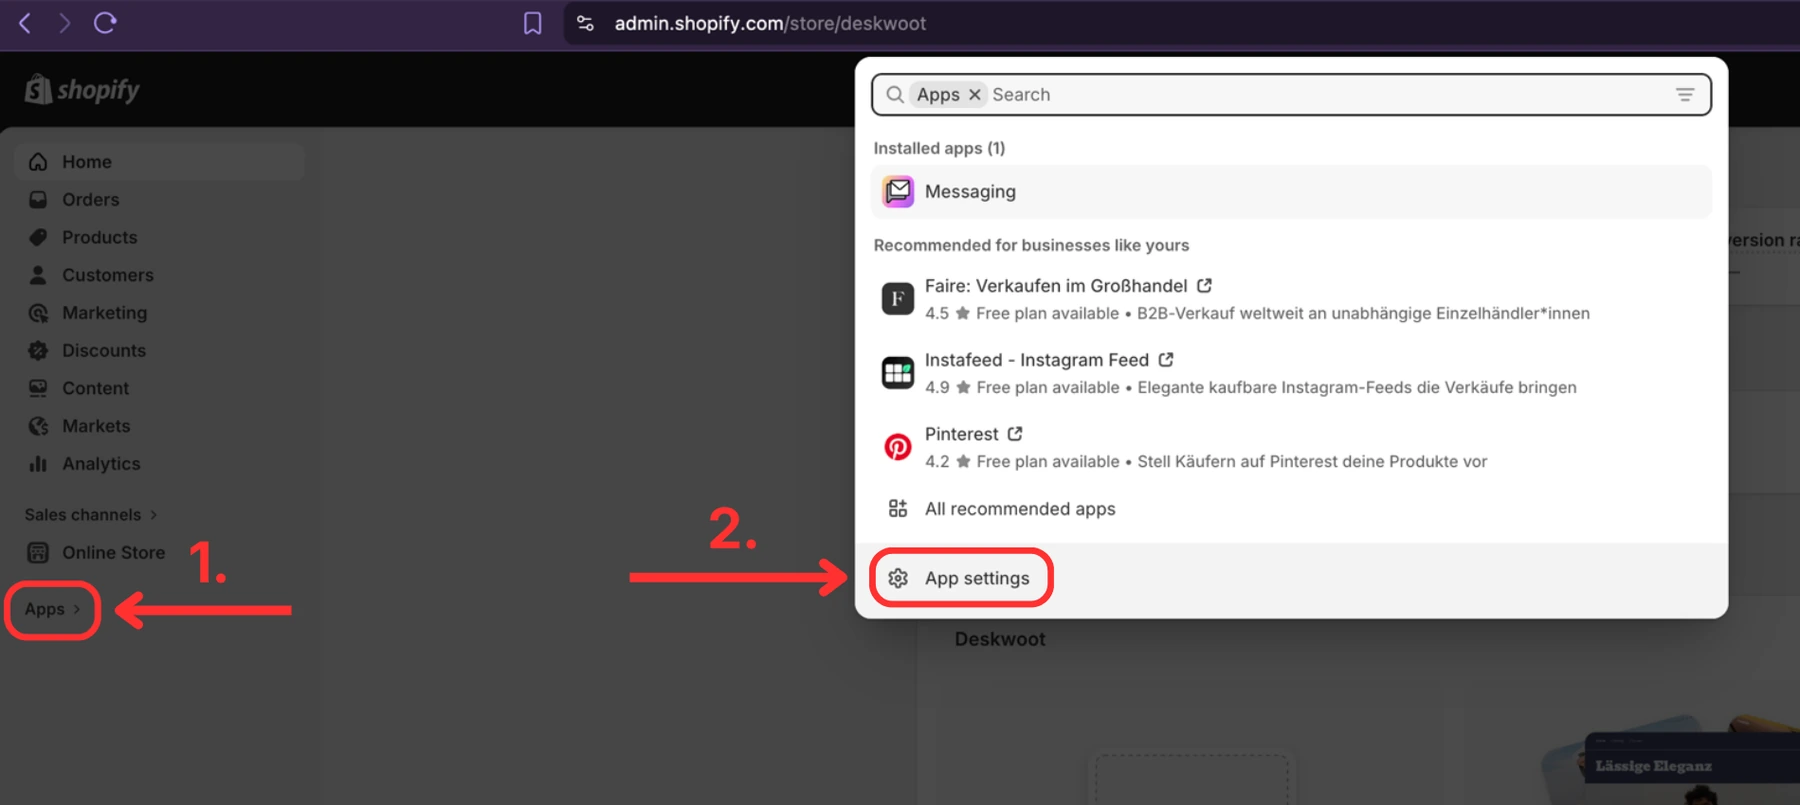
Go to https://dev.shopify.com and log in with the same Shopify account you use for your store. In the left sidebar click Apps (1.), then click App settings in the popup that appears (2.).
Step 2. Copy your Shop URL and click Develop apps
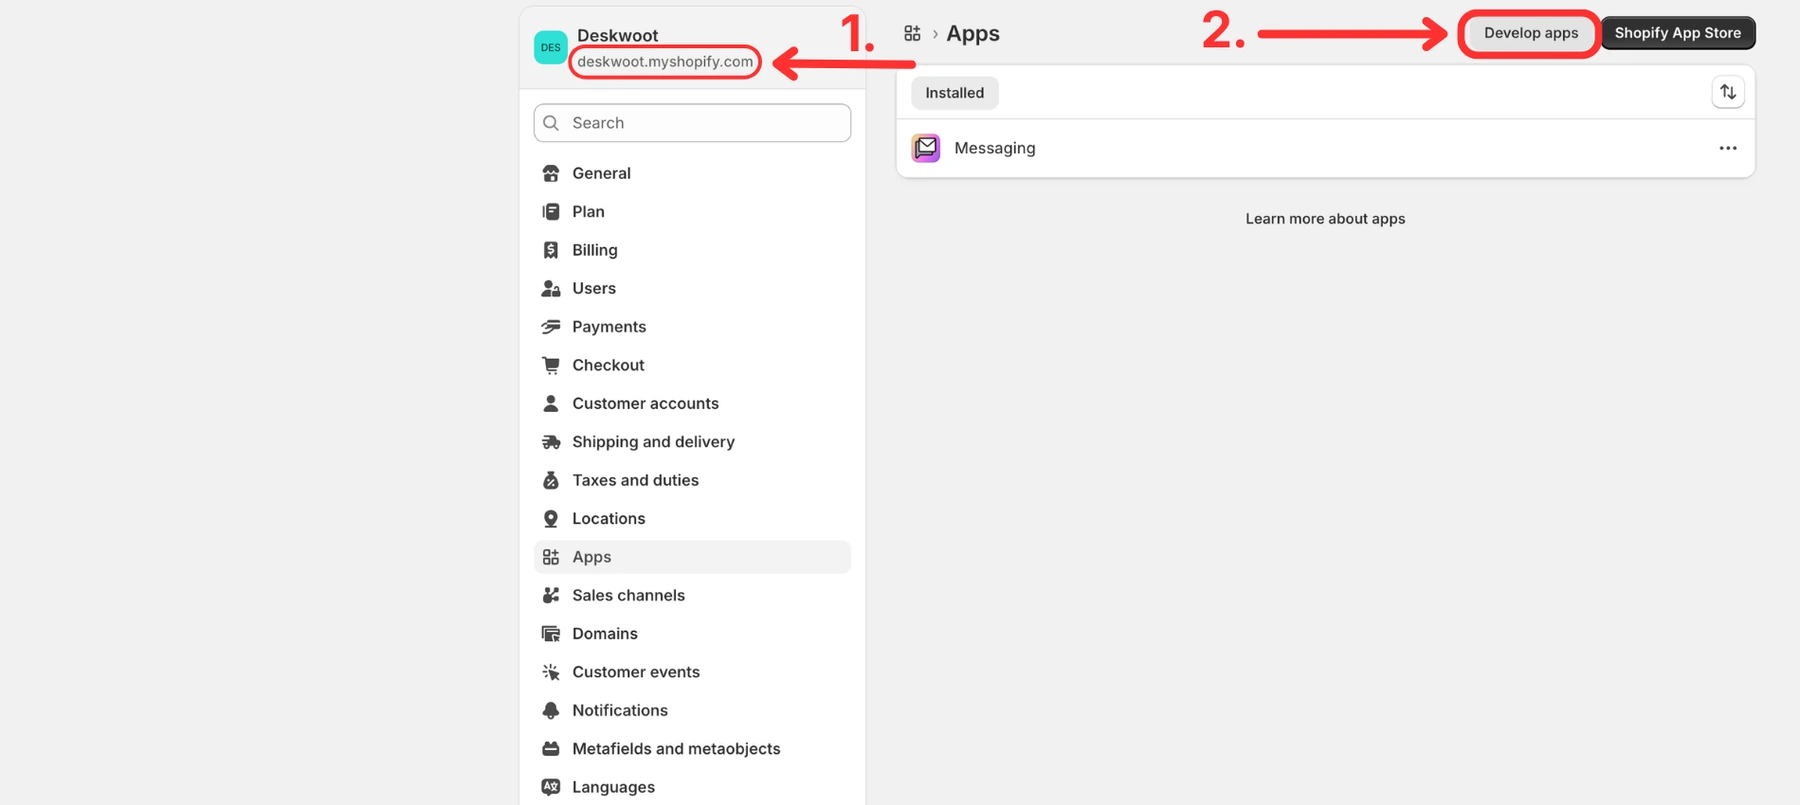
This is the standard Shopify Admin Apps page. You can also reach it from admin.shopify.com directly, then Settings, then Apps. At the top left you see your shop URL, something like your-store.myshopify.com. Copy that value somewhere safe, you will paste it into Deskwoot at the end. Then click Develop apps in the top right.
Step 3. Build apps in Dev Dashboard
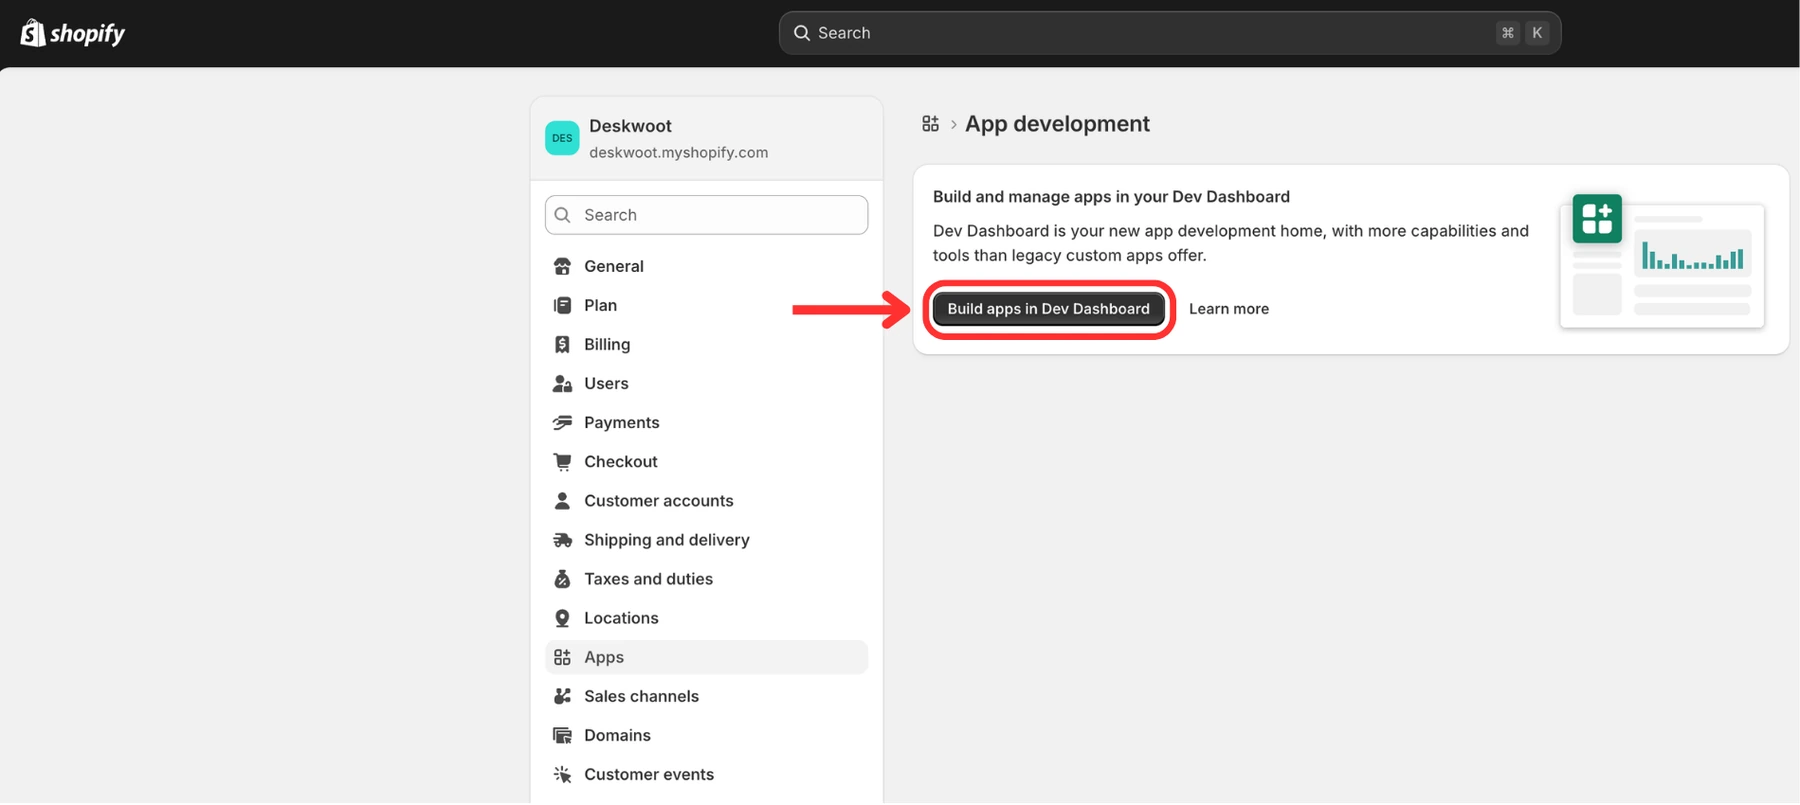
Click Build apps in Dev Dashboard. This opens the actual app builder where you will create your private app.
Step 4. Create app
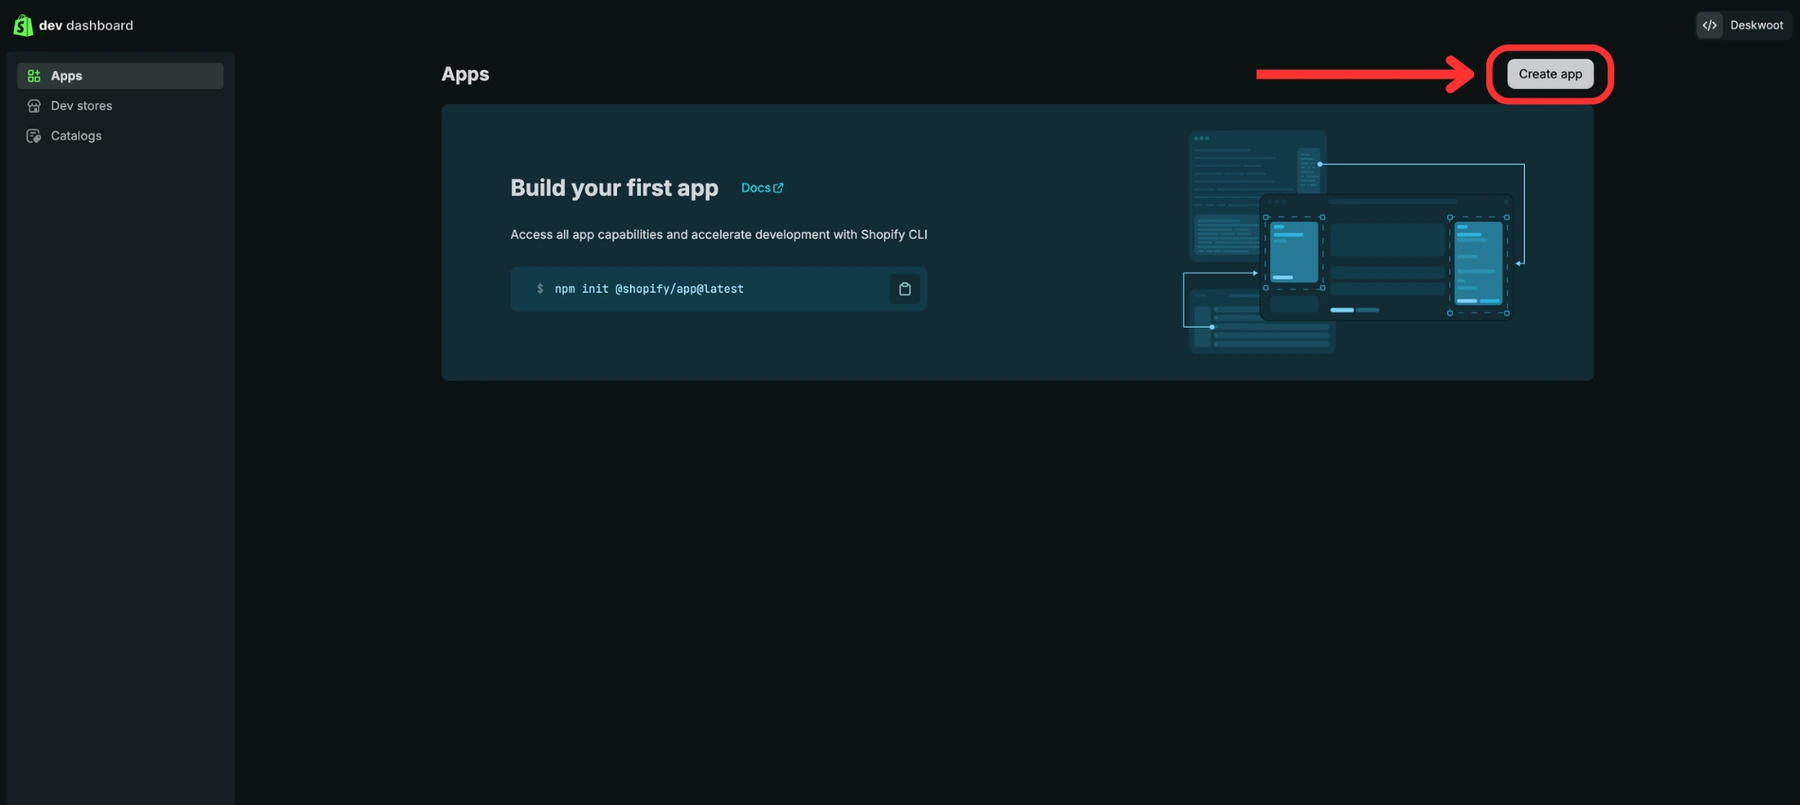
Click the Create app button in the top right.
Step 5. Pick a name and create the app
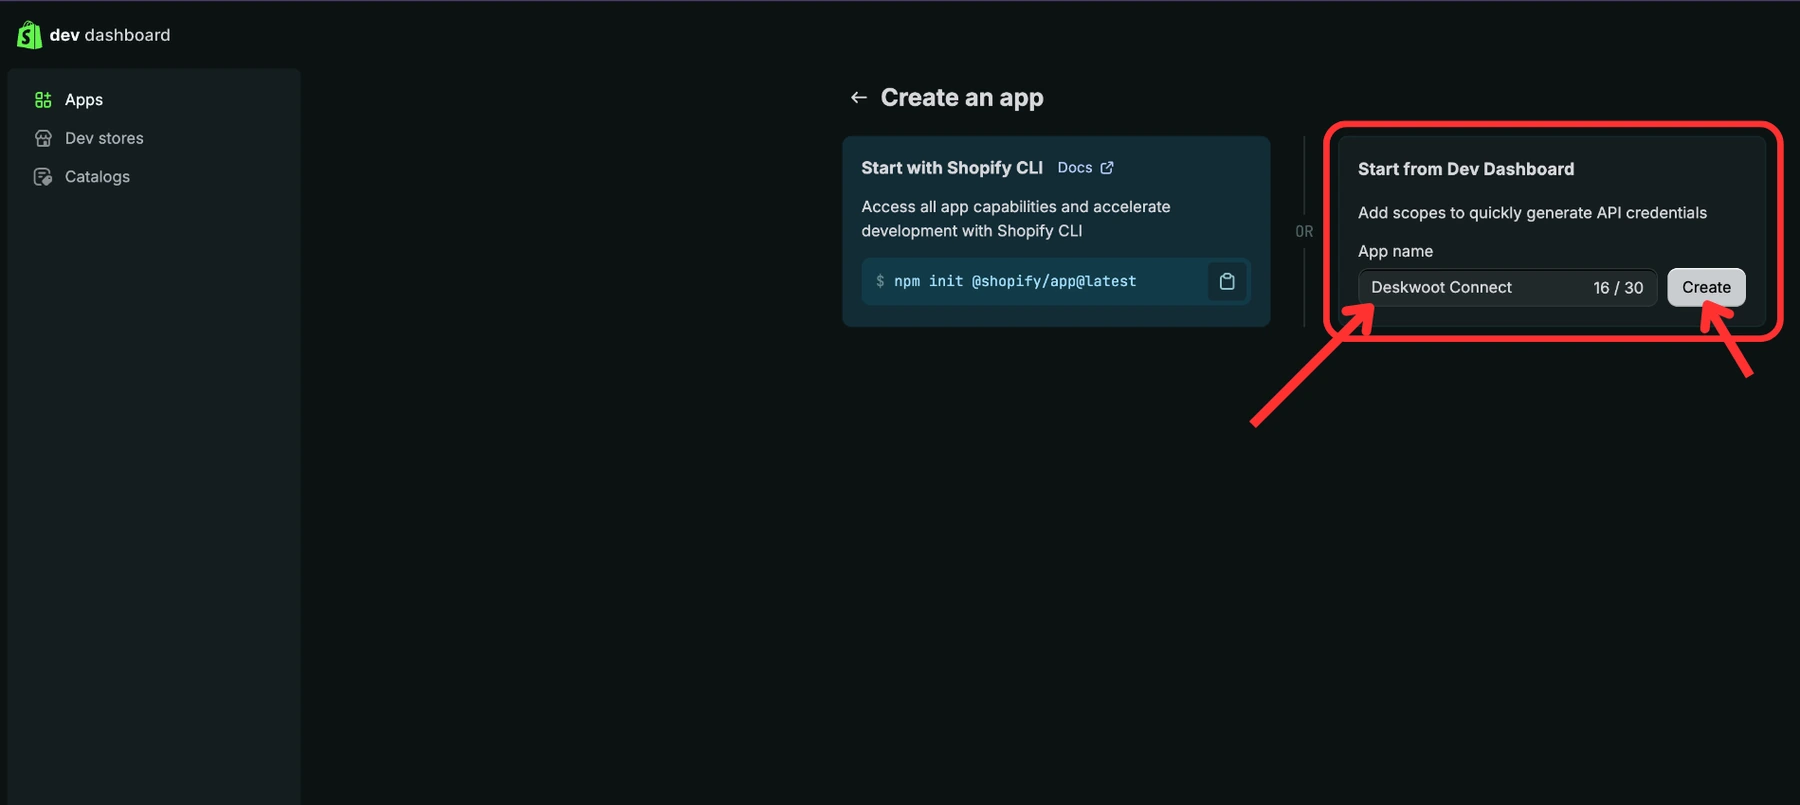
Choose Start from Dev Dashboard, you do not need the CLI option. Type any name you like in the right side field (1.), for example Deskwoot Connect. Then click Create (2.).
Step 6. Configure URL, embed, and scopes
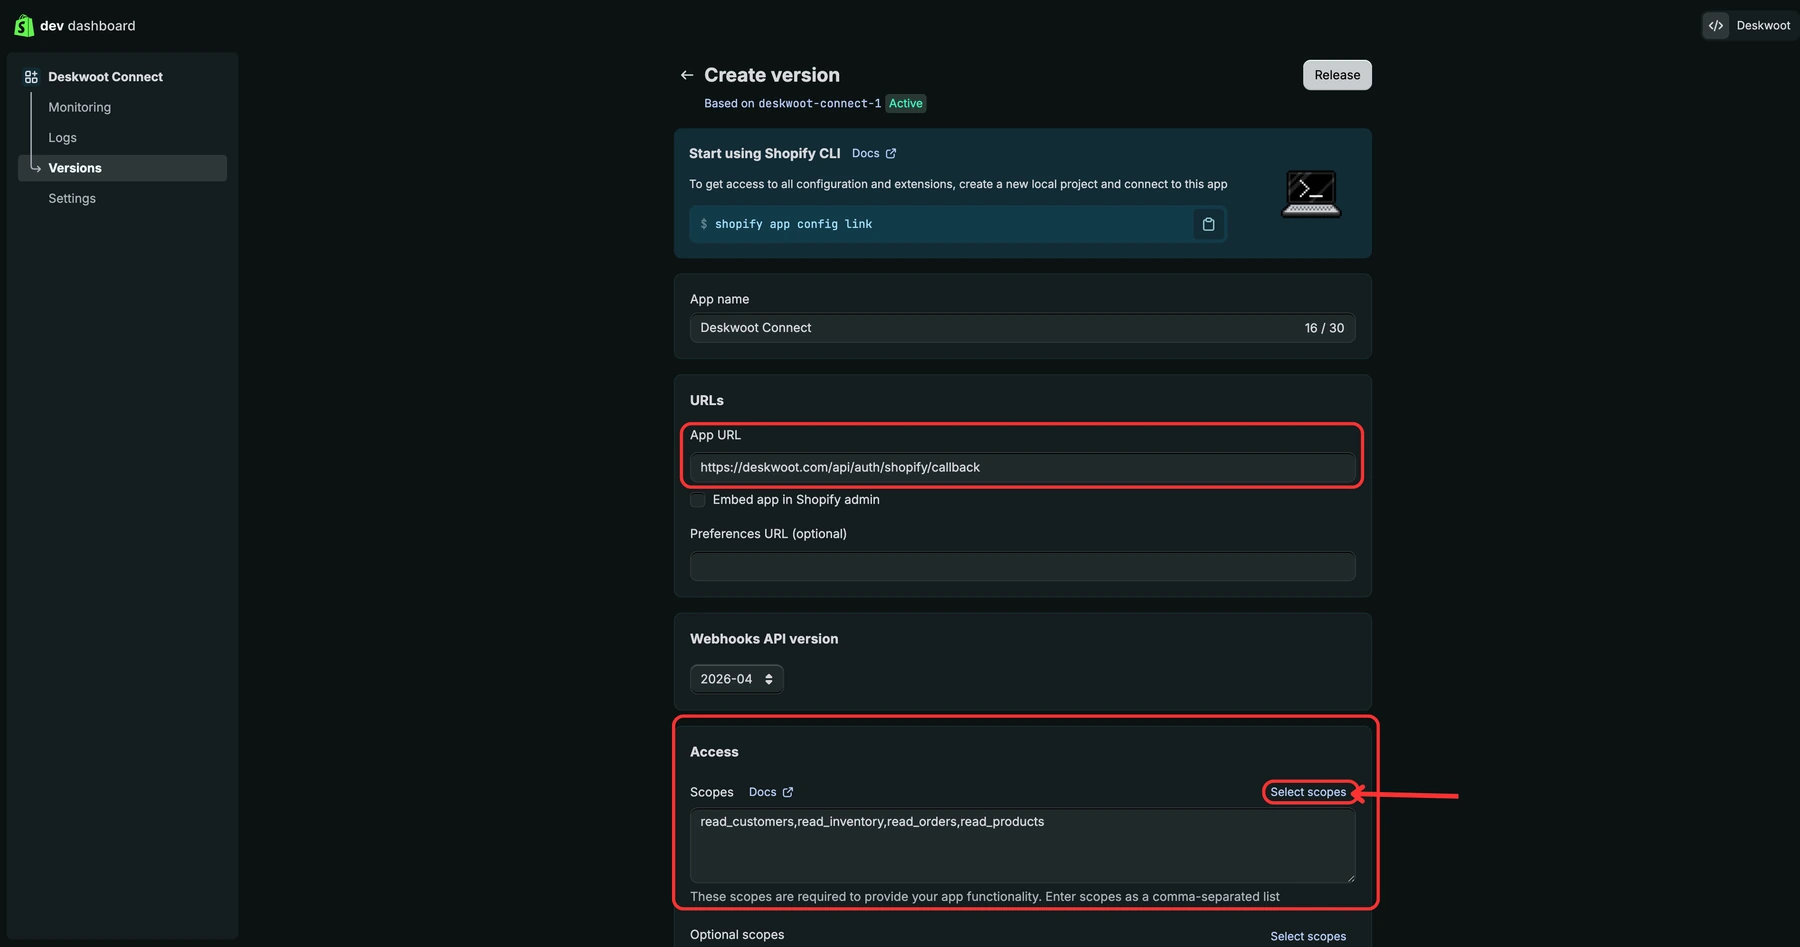
Shopify drops you onto the Versions page. Set three things on this page:
- (1.) App URL: paste
https://deskwoot.com/api/auth/shopify/callback - (2.) Embed app in Shopify admin: untick this box. Deskwoot does not render inside the Shopify admin, so embedding only adds noise.
- (3.) Scopes: click Select scopes on the right, in the Access section. You need exactly four scopes, all under "Admin API":
read_customers(Customer)read_orders(Orders)read_products(Products)read_inventory(Inventory)
Step 7. Add Redirect URL and click Release
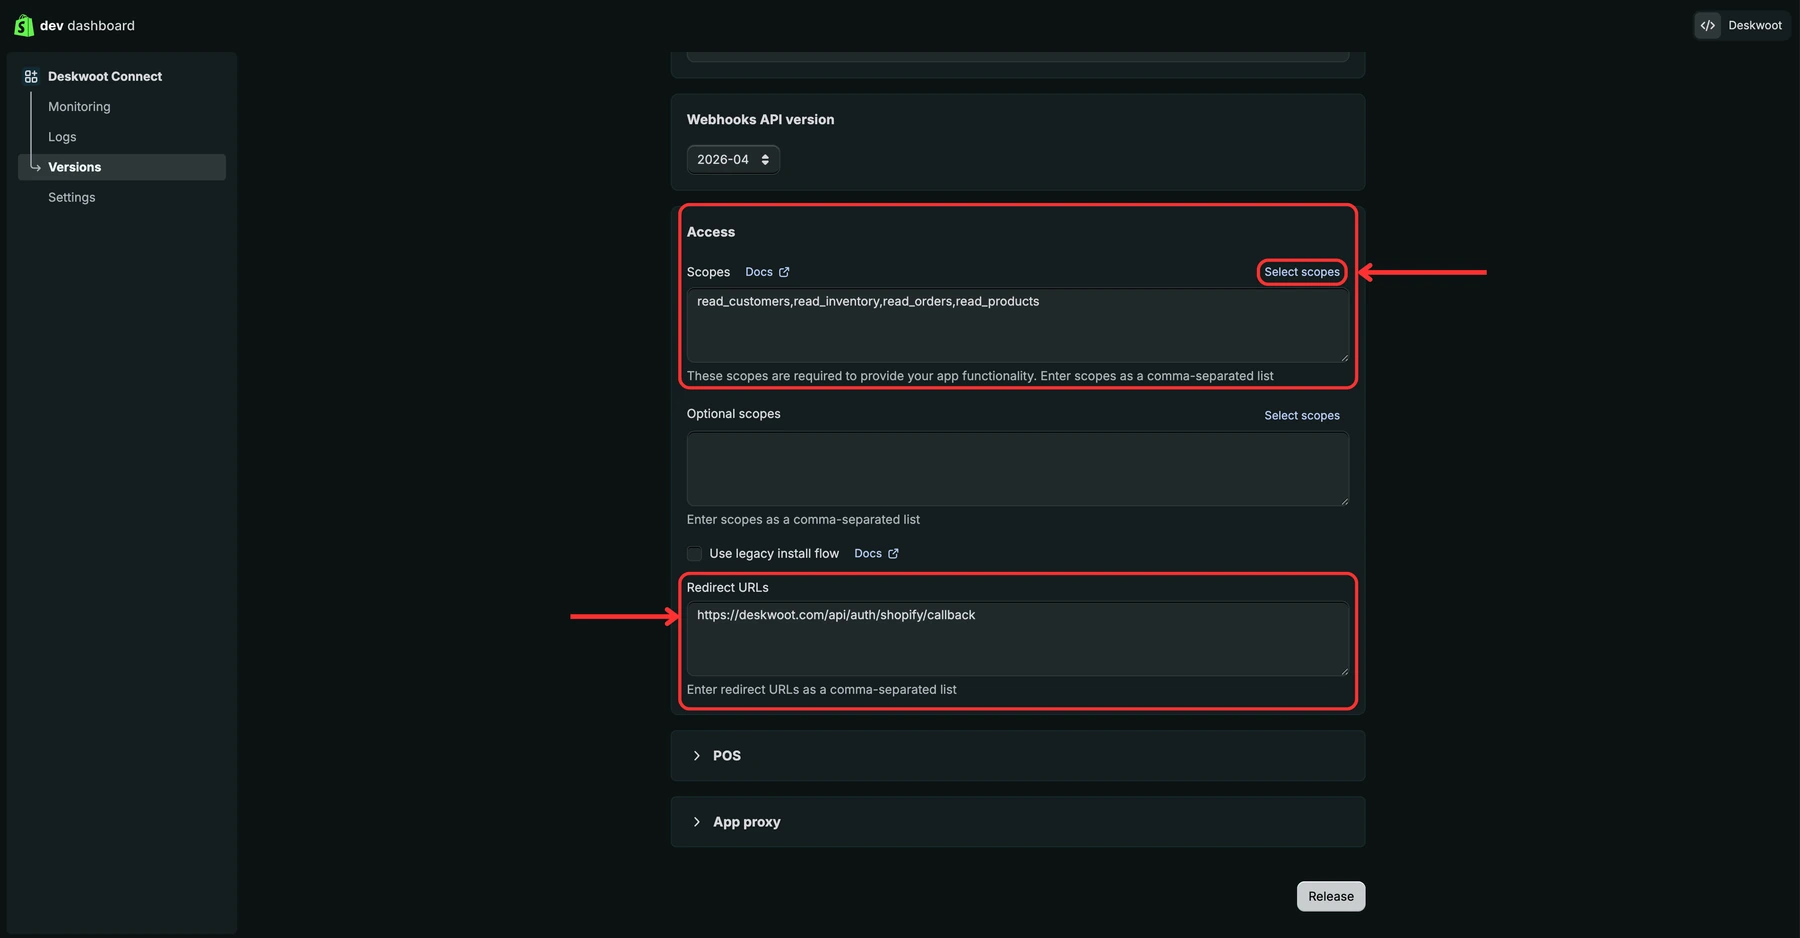
Stay on the same page and scroll down. Set:
- (4.) Redirect URLs: paste
https://deskwoot.com/api/auth/shopify/callback(the same URL as the App URL field above).
Leave Optional scopes, Use legacy install flow, POS, and App proxy at their defaults. Then click Release (5.) at the bottom right.
Step 8. Confirm the release
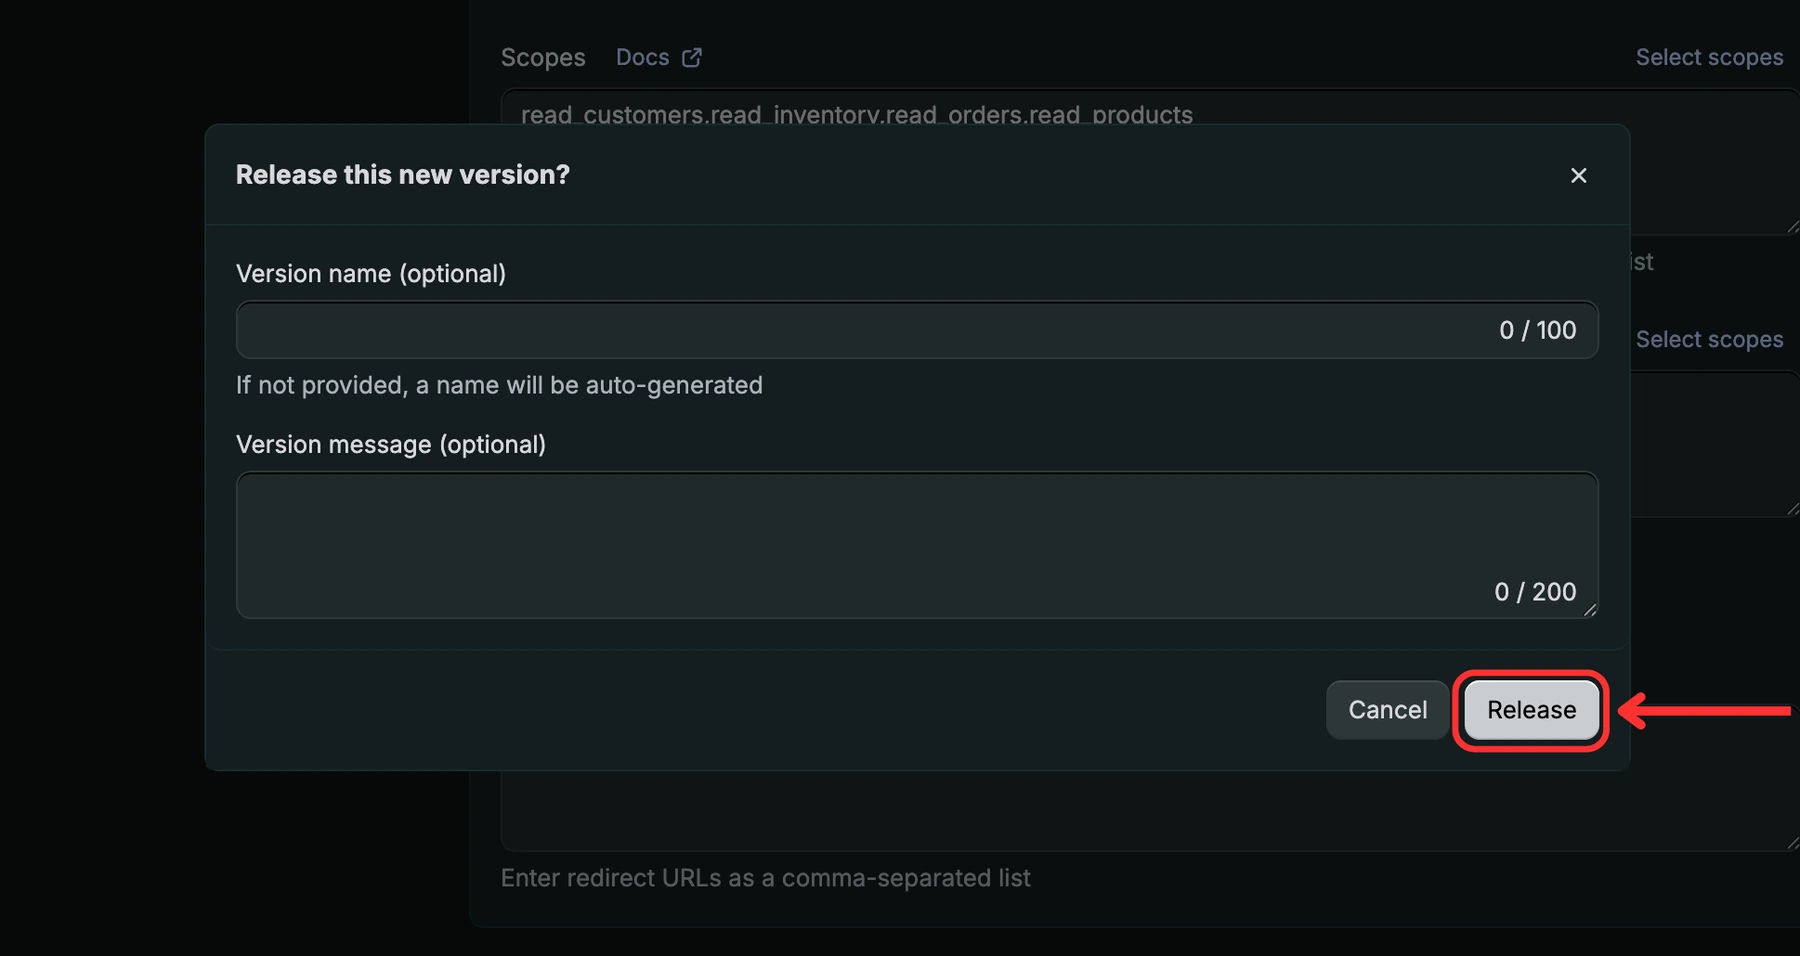
A confirmation dialog opens. Click Release again to publish the version.
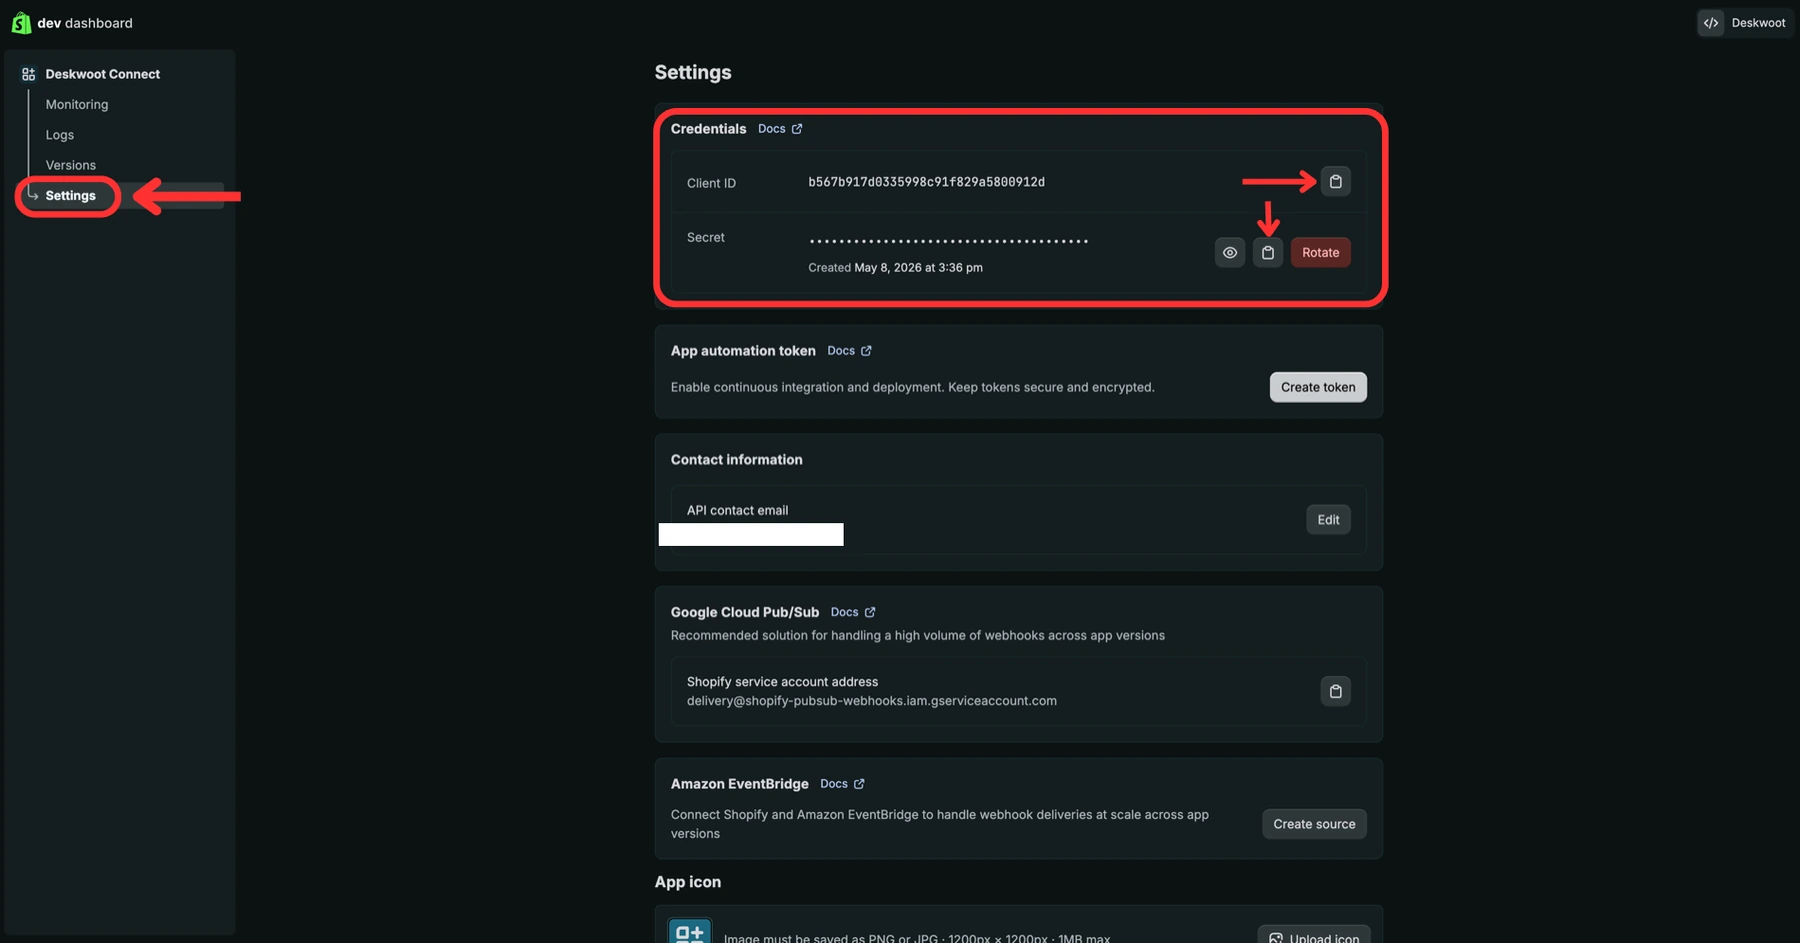
Step 9. Copy Client ID and Client Secret
In the left sidebar of your app, click Settings. The Credentials section at the top shows two values:
- (6.) Client ID: a public string that identifies your app. Click the copy icon next to it.
- (7.) Client Secret: hidden by default. Click the eye icon to reveal it, then click the copy icon next to the secret.
Keep both values handy, you will paste them into Deskwoot in the next step.
Step 10. Paste everything into Deskwoot
In Deskwoot, go to Settings, Integrations and click the Shopify card. Fill in three fields:
- Shop Domain: the URL you copied in Step 2, for example
your-store.myshopify.com(nohttps://). - Client ID: the value you copied in Step 9.
- Client Secret: the matching secret from Step 9. Deskwoot uses it once to complete the install handshake and never stores it.
Click Connect with Shopify. You will be redirected to your store, asked to approve the four read only scopes, and sent back to Deskwoot once you click Install app. The integration is then ready and Deskwoot starts a first sync of customers and orders in the background.
What you see after connecting
The conversation sidebar shows the customer's full Shopify history: order numbers, financial and fulfilment status, totals, line items, and tracking. Customer profile data (name, email, lifetime spend, Shopify tags) flows into the Deskwoot contact profile so agents have full context without switching tools. The AI bot picks up the same data automatically and can answer order status questions, share tracking links, or reference past purchases without human intervention.
Troubleshooting
"Shopify rejected the install signature"
Almost always means the Client Secret you pasted into Deskwoot does not match the Client ID. Go back to dev.shopify.com, your app, Settings, Credentials, copy both values again carefully, and retry.
"The install link took too long"
Install links expire 15 minutes after you click Connect with Shopify. If you walked away mid install, click Connect with Shopify again to start a fresh attempt.
"Shopify refused to exchange the install code for an access token"
Usually one of: (a) the Client Secret is wrong, or (b) the Redirect URLs setting in Dev Dashboard does not include https://deskwoot.com/api/auth/shopify/callback. Double check both, then retry.
"The shop Shopify sent back didn't match the Shop Domain"
The shop you typed into Deskwoot is different from the store you actually approved on Shopify. The error banner shows both values. Re-enter the Shop Domain that Shopify confirmed (it is your real your-store.myshopify.com URL from Step 2) and try again.
The app shows up in Shopify's admin but Deskwoot says "not connected"
You completed the consent screen on Shopify but the redirect back to Deskwoot got interrupted (closed tab, network blip). Click Connect with Shopify in Deskwoot again. Shopify will skip the permission screen on the second pass since the app is already approved, and the integration row gets written this time.
Customer data isn't appearing in conversations
Check the customer's email in the Deskwoot conversation matches their Shopify customer email exactly. Mismatches prevent the lookup. For stores with large catalogues, the initial sync may take 10 to 15 minutes after connect, refresh the conversation after the sync completes.
FAQ
Can I connect more than one Shopify store to one Deskwoot account?
Not yet. Each Deskwoot account currently supports a single Shopify integration. If you run multiple stores, use a separate Deskwoot account per store.
What does Deskwoot do with the Client Secret?
Deskwoot uses it once, immediately, to complete the OAuth handshake with Shopify. It is never written to our database. Only the resulting access token is stored, encrypted at rest.
Can I revoke access later?
Yes. Disconnecting the integration in Deskwoot deletes the stored access token. To fully revoke on Shopify's side, also uninstall the app from your Shopify admin under Settings, Apps and sales channels.
What permissions does Deskwoot ask for?
Read only access to customers, orders, products, and inventory. Deskwoot never writes to your store, never modifies orders, and never touches checkout or pricing.